
Visual Studio 2010 單鍵發行簡單使用 Web.Release.config
Visual Studio 2010 版提供了一個相當方便的功能【單鍵發行】讓網站開發者只需要花費一次的時間就可以享受到往後的便利,在使用 Visual Studio 2008以前版本想要達到【單鍵發行】需要安裝 Web Deployment Project 既然現在內建了,那就應該是要會用,設定方法已經有很多文章可以搜尋的到了,所以這裡 demo 簡單的介紹 新增的 兩種 Web.Config 內的 Web.Release.config 設定方法
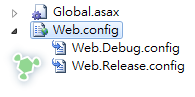
專案建立後可以看到 Web.config 變成有包含 Group Item 的樣子,點下去就可以看到多了Web.Release.config 和 Web.Debug.config 兩個檔案
本文的重點是 Web.Release.config 因為 Web.Debug.config 通常就是預設的 Web.config 而且設定方法都一樣所以不介紹它,點開 Web.Release.config 後會看到以下詳盡的註解
<?xmlversion="1.0"encoding="utf-8"?><!-- 有關使用 web.config 轉換的詳細資訊,請造訪 http://go.microsoft.com/fwlink/?LinkId=125889 --><!--在下面的範例中,"SetAttributes" 轉換只會在 "Match" 定位程式找到值為 "MyDB" 的屬性 "name" 時,才將 "connectionString" 的值變更為使用 "ReleaseSQLServer"。<connectionStrings><add name="MyDB"connectionString="Data Source=ReleaseSQLServer;Initial Catalog=MyReleaseDB;Integrated Security=True"xdt:Transform="SetAttributes" xdt:Locator="Match(name)"/></connectionStrings>--><system.web><compilationxdt:Transform="RemoveAttributes(debug)"/><!--在下面的範例中,"Replace" 轉換將會取代 web.config 檔案的整個 <customErrors> 區段。請注意,因為在 <system.web> 節點之下只有一個 customErrors 區段,所以不需要使用 "xdt:Locator" 屬性。<customErrors defaultRedirect="GenericError.htm"mode="RemoteOnly" xdt:Transform="Replace"><error statusCode="500" redirect="InternalError.htm"/></customErrors>--></system.web></configuration>
以上的註解其實還滿容易了解的,拿一個簡單範例來說
假設在開發環境中你的 資料庫位置在於 127.0.0.1 那在 Web.Config 一定會有一個連線字串長這樣
<connectionStrings>
<add name=”MyDB”
connectionString=”Data Source=127.0.0.1;Initial Catalog=MyReleaseDB;Integrated Security=True”/>
</connectionStrings>當然這樣的連線字串給客戶時是不會通的,以往都是用手動調整 Web.Config 給客戶,這種方式不但麻煩而且經常忘記,並且發佈給客戶的檔案應該都要給 Release 版這篇文章有提到為什麼該用 Release([筆記]編譯時遇到 無法載入 System.Data.Entity.Design.AspNet.EntityDesignerBuildProvider 錯誤的解決方法) 這時候只需要開啟 Web.Release.config 調整如下
<connectionStrings><addname="MyDB"connectionString="Data Source=demo.tc;Initial Catalog=MyReleaseDB;Integrated Security=True"xdt:Transform="SetAttributes"xdt:Locator="Match(name)"/></connectionStrings>這樣子再使用 Release 組件組態發行的時候就會自動更改 將 127.0.0.1 改成 demo.tc 了,其中的重點就在於 name 和
xdt:Locator=”Match(name)” 這兩段,因為我們今天要改的是連線字串所以就是包在 connectionStrings 標籤內 利用了 Match(name) 告訴轉換器 當發現 connectionStrings 內有 name=MyDB 的就會置換掉,算是很容易理解,如果有多個就寫多次就好,以下用經常性很多的 appSettings 來做示範
<appSettings><addkey="emailAccount"value="service@com.tw"xdt:Transform="SetAttributes"xdt:Locator="Match(key)"/><addkey="emailPassword"value="1234"xdt:Transform="SetAttributes"xdt:Locator="Match(key)"/><addkey="systemFromEmail"value="service@com.tw"xdt:Transform="SetAttributes"xdt:Locator="Match(key)"/></appSettings>可以看到因為 appSettings 並不是用 name 而是用 key 所以 Match 就是使用Match(key) 而非 Match(name),利用以上的方法可以很快的置換開發機與正式機不同的設定,讓部屬的時候需要手動調整的部份降低到最少。
如果你是使用 ASP.NET MVC 你可能會發現在使用 Release 編譯並且有開編譯 View 時很容易發生
在應用程式層級之外使用註冊為 allowDefinition=’MachineToApplication’ 的區段發生錯誤。錯誤的原因可能是虛擬目錄尚未在 IIS 中設定為應用程式。 這錯誤,這原因是因為殘留檔案的影響解決方法為在你的專案(方案)上使用清除專案(方案)後再重新編譯一次即可,當然你有更簡單的作法安裝 VSCommands 2010 這套件後方案總管上就會有掃把圖示可以按,按下去後你每次編譯的時候都會清除 obj 內的檔案

Reference from: http://demo.tc/Post/661